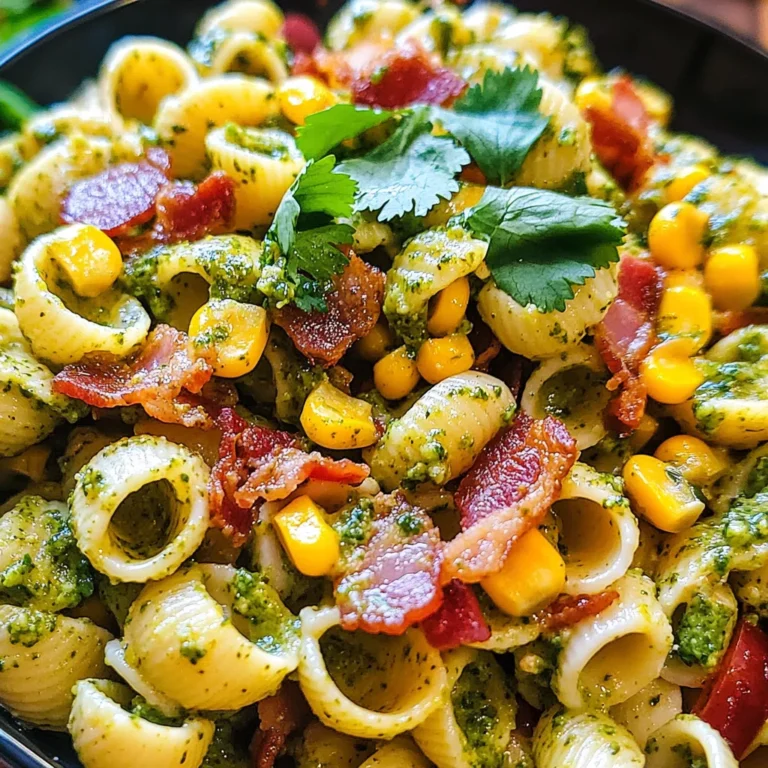
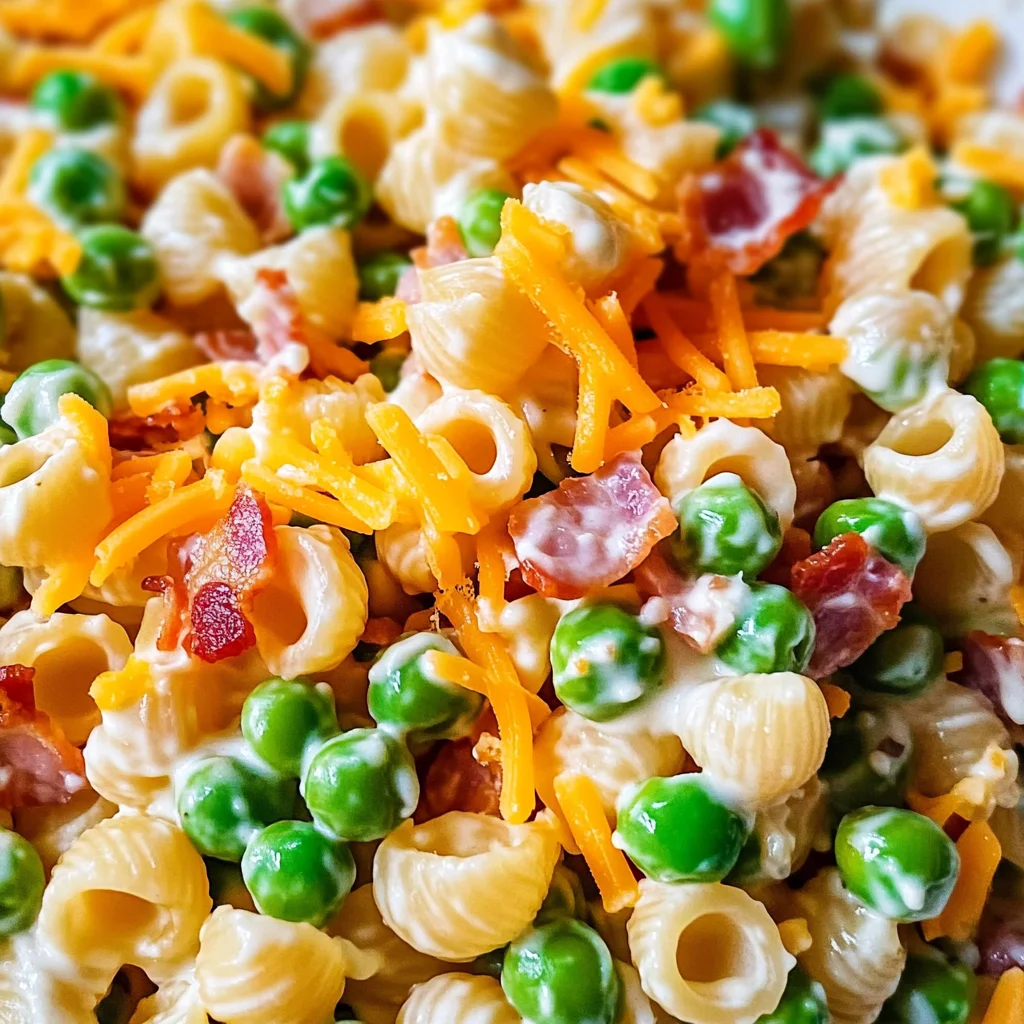
Pea Pasta Salad
Pea Pasta Salad is a delightful and creamy dish perfect for potlucks, BBQs, or any gathering. This vibrant salad combines the sweetness of peas with the comforting texture of mini pasta shells, making it a favorite among guests. With its creamy ranch dressing and the savory taste of Turkey turkey bacon, this salad stands out not just in flavor but also in presentation. Serve it cold for a refreshing side that’s sure to impress!
Why You’ll Love This Recipe
- Easy to Prepare: This dish comes together in about 20 minutes, making it perfect for last-minute gatherings.
- Crowd-Pleaser: The combination of flavors and textures appeals to both kids and adults, ensuring everyone will enjoy it.
- Versatile: Perfect as a side dish or a light meal on its own, this pea pasta salad fits various occasions.
- Make-Ahead Friendly: Prepare it a day in advance! It tastes even better after chilling overnight.
- Delicious Leftovers: Enjoy the creamy goodness as a quick lunch the next day; it holds up well in the fridge.
Tools and Preparation
To create this Pea Pasta Salad, you’ll need a few essential tools to ensure your preparation is smooth and efficient.
Essential Tools and Equipment
- Mixing bowl
- Measuring cups
- Cooking pot
- Strainer
- Spatula
Importance of Each Tool
- Mixing bowl: A large mixing bowl is crucial for combining all ingredients without spilling.
- Measuring cups: Accurate measurements help ensure the best flavor balance in your dressing.
- Cooking pot: A good quality pot makes boiling pasta quick and easy, helping to avoid overcooking.
- Strainer: Essential for draining pasta thoroughly, preventing excess water from diluting your salad.
Ingredients
For the Pasta Salad
- 8 oz. mini pasta shells (cooked and cooled)
- 2 cups frozen peas (frozen or refrigerator thawed)
- 1 cup real mayonnaise
- 1/2 cup shredded cheddar cheese
- 2 green onions (sliced)
- 6 strips Turkey turkey bacon (cooked and chopped into small pieces)
- 2 tablespoons ranch seasoning
How to Make Pea Pasta Salad
Step 1: Cook the Turkey Bacon
- Begin by cooking 6 strips of crispy Turkey turkey bacon until fully cooked.
- If you’re short on time, feel free to use pre-cooked Turkey turkey bacon or bits. Fresh ingredients always provide better flavor.
Step 2: Prepare the Pasta Shells
- Boil mini pasta shells according to package directions.
- Once cooked, drain them and rinse with cold water. If they stick together, re-rinse them briefly.
Step 3: Combine Ingredients
- After the turkey bacon cools, chop it into small bite-sized pieces.
- In a large mixing bowl, combine mayonnaise and ranch seasoning until well blended.
Step 4: Mix It All Together
- Add shredded cheddar cheese, sliced green onions, chopped turkey bacon, cooled pasta shells, and frozen peas to the bowl.
- Use a spatula to gently fold everything together until all ingredients are coated with dressing.
Step 5: Chill Before Serving
- Refrigerate the salad for 2-4 hours or overnight for best results; this allows flavors to meld beautifully while keeping peas firm.
Step 6: Serve and Enjoy!
- Before serving, feel free to top with additional shredded cheddar cheese and turkey bacon for an extra touch.
- Enjoy this creamy Pea Pasta Salad as a delicious side dish at your next gathering!
How to Serve Pea Pasta Salad
Pea pasta salad is a versatile dish that can be enjoyed in many ways. Whether you’re hosting a BBQ or looking for a quick lunch, this creamy salad is sure to please.
As a Side Dish
- Pair it with grilled chicken or turkey breast for a balanced meal.
- Serve alongside burgers or hot dogs at your summer cookouts for an extra pop of flavor.
For Picnics and Potlucks
- Pack it in individual containers for easy sharing during outdoor gatherings.
- Add some fresh herbs as a garnish to enhance presentation and taste.
As a Light Lunch
- Enjoy it on its own for a refreshing midday meal.
- Top with additional cheese or Turkey turkey bacon for added protein.
How to Perfect Pea Pasta Salad
To make the best pea pasta salad, focus on these essential tips that will elevate your dish’s flavor and texture.
- Use fresh ingredients: Fresh peas and quality mayonnaise will enhance the overall taste.
- Chill before serving: Allow the salad to refrigerate for several hours to meld flavors together perfectly.
- Adjust seasoning: Taste and tweak the ranch seasoning to suit your preference for a personalized touch.
- Mix gently: Stir carefully to avoid breaking the pasta shells while blending all ingredients together.
- Add variety: Consider tossing in other veggies like bell peppers or cucumbers for added crunch.
Best Side Dishes for Pea Pasta Salad
Pea pasta salad pairs well with numerous side dishes, making it a great addition to any meal. Here are some options:
- Grilled Vegetables: Charred zucchini, bell peppers, and asparagus complement the creamy salad beautifully.
- Coleslaw: A tangy coleslaw adds crunch and balances the creaminess of the pasta salad.
- Garlic Bread: Serve warm garlic bread on the side for a delightful contrast in textures.
- Fruit Salad: A refreshing fruit salad can lighten up your meal, providing natural sweetness.
- Potato Wedges: Crispy potato wedges add heartiness and pair well with the flavors of the pea pasta salad.
- Caesar Salad: A classic Caesar brings crisp romaine and tangy dressing that complements your dish nicely.
Common Mistakes to Avoid
When making Pea Pasta Salad, it’s easy to make a few common mistakes that can affect the final dish. Here are some tips to ensure your salad turns out perfectly.
- Not Cooking Pasta Properly: Overcooking or undercooking pasta can lead to a mushy texture. Always follow the package instructions and taste-test for doneness.
- Skipping the Chill Time: Serving the salad immediately can prevent flavors from developing. Refrigerate for at least 2-4 hours to enhance the taste.
- Using Stale Ingredients: Fresh ingredients make all the difference. Check that your mayonnaise and cheese are fresh before use to avoid off-flavors.
- Neglecting Seasoning: A bland salad is unappetizing. Be sure to use enough ranch seasoning and taste as you mix for the perfect flavor balance.
- Overloading with Add-ins: While it’s tempting to add many ingredients, too much can overwhelm the dish. Stick to the recipe for a harmonious flavor profile.

Storage & Reheating Instructions
Refrigerator Storage
- Store in an airtight container for up to 3 days.
- Keep away from strong-smelling foods to prevent flavor transfer.
Freezing Pea Pasta Salad
- Freezing is not recommended, as it can affect the texture of the peas and pasta.
- If necessary, freeze without dressing and add dressing after thawing.
Reheating Pea Pasta Salad
- Oven: Preheat oven to 350°F (175°C) and heat in a covered dish until warm, about 15 minutes.
- Microwave: Place in a microwave-safe bowl, cover loosely, and heat in 30-second intervals until warmed through.
- Stovetop: Heat gently in a skillet over low heat, stirring frequently until warmed.
Frequently Asked Questions
Here are some common questions about preparing Pea Pasta Salad.
Can I use different pasta shapes for Pea Pasta Salad?
Yes! You can substitute mini shells with other small pasta shapes like rotini or penne to add variety.
How do I customize my Pea Pasta Salad?
You can add chopped vegetables like bell peppers or cucumbers for extra crunch or swap out Turkey turkey bacon for grilled chicken or chickpeas.
What makes this Pea Pasta Salad creamy?
The combination of mayonnaise and ranch seasoning creates a rich and creamy dressing that coats every bite of pasta and peas.
Is Pea Pasta Salad good for meal prep?
Absolutely! It stores well in the refrigerator and makes a great lunch option throughout the week.
Final Thoughts
Pea Pasta Salad is not only easy to prepare but also incredibly versatile. This dish shines at potlucks and BBQs while providing room for customization based on personal preferences. Give it a try, and feel free to experiment with different ingredients!

Pea Pasta Salad
- Total Time: 25 minutes
- Yield: Serves 6
Description
Pea Pasta Salad is a vibrant and creamy dish that’s ideal for any gathering, from potlucks to BBQs. This delightful salad features the natural sweetness of peas combined with the comforting texture of mini pasta shells, creating a colorful presentation that captivates guests. Tossed in a rich ranch dressing and enhanced with turkey bacon, it’s not just delicious but also refreshing when served cold. Quick to prepare and easy to customize, this Pea Pasta Salad is sure to impress everyone at your next event!
Ingredients
- 8 oz. mini pasta shells (cooked and cooled)
- 2 cups frozen peas (frozen or refrigerator thawed)
- 1 cup real mayonnaise
- 1/2 cup shredded cheddar cheese
- 2 green onions (sliced)
- 6 strips turkey bacon (cooked and chopped into small pieces)
- 2 tablespoons ranch seasoning
Instructions
- Cook the turkey bacon until crispy; chop into small pieces.
- Boil mini pasta shells per package instructions; drain and rinse with cold water.
- In a large bowl, mix mayonnaise and ranch seasoning until smooth.
- Combine cooled pasta shells, peas, turkey bacon, cheddar cheese, and green onions in the bowl; fold gently to coat with dressing.
- Refrigerate for 2-4 hours or overnight for best flavor before serving.
- Prep Time: 15 minutes
- Cook Time: 10 minutes
- Category: Side Dish
- Method: Mixing
- Cuisine: American
Nutrition
- Serving Size: 1 cup (240g)
- Calories: 370
- Sugar: 3g
- Sodium: 620mg
- Fat: 24g
- Saturated Fat: 4g
- Unsaturated Fat: 18g
- Trans Fat: 0g
- Carbohydrates: 29g
- Fiber: 4g
- Protein: 10g
- Cholesterol: 20mg